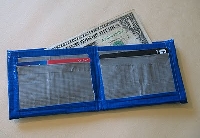
How to make a duct tape wallet
By Catalogs Editorial Staff

Learn how to make a duct tape wallet with these easy instructions
If you are looking for a fun craft to do with your children, or if you just have some time on your hands, make a duct tape wallet.
?Duct tape,? you ask.
Yes, and not the silver stuff used to actually wrap a pipe. Duct tape now comes in a variety of colors and patterns in your local craft store. When I first saw this tape, I thought it would be a neat way to cover a notebook or mark a backpack for camp. Little did I know people were using it to make wallets out of it.
Below are the instructions on how to make a duct tape wallet for your cash, credit cards and whatever else you want.
You will need duct tape, a pair of scissors and a credit or bankcard, something to make sure your measurements are correct. After all, you do not want to make a wallet and find your money or your credit cards don?t fit. It is like making a swatch when you knit. It is unavoidable so you do not have to rip out your work and start over later on.
Choose your favorite tape
- Cut four 10? strips of tape and overlap sticky side up
- Do it again with four more pieces of tape and cover sticky sides of the first four pieces
- Cut two extra strips and stick length-wise half way up, then fold over to make a covered seam on each end
- Lay a dollar bill along bottom and two credit cards along top to make sure your main section of the duct tape wallet is large enough to hold your cash
- Set this piece aside
~
Measure credit cards
- Using a credit card as a pattern, follow the same procedure as above to make three long sections that would fit two credit cards side by side leaving space in between to secure it to the main piece
- Lay these three finished sections length wise and overlapping slightly
- Create another covered seam on each shorter side by overlapping a length of tape before folding over to secure
- Trim edges
Add to main section
- Lay card section on the top half of the larger section leaving room to fold entire piece in half comfortably
- Secure tape in center of card section and fold over behind the card section only. You do not want to close off the pocket where you put your paper money
- Fold entire piece length-wise keeping the card section in front. It will look wrong, but when you fold it, this section will become the inside section of the duct tape wallet
- Create another seam all around the piece being careful to secure the credit card pocket section on the bottom and sides
- Fold entire wallet in half and make one last seam along the shorter sides before trimming the edges.
There you have it! Step-by-step instructions on how to make a duct tape wallet.
You are not limited to making a wallet either. Use this basic formula to make checkbook covers, business card cases or any envelope-type items. Go big and make a folder rather than covering one or try your hand at an actual envelope. As long as it is the correct size and has the right amount of postage on it, you can send it through the U.S. Mail.
A duct tape wallet may be just the beginning of your creativity with duct tape!
Popular Savings Offers


