

How to draw flowers
By Catalogs Editorial Staff
Knowing how to draw flowers will have you creating blooms in a few simple steps
Flowers are always enjoyable to look at, which makes sense, since you often find them in paintings and drawings. But their popularity doesn’t mean they are easy to create. Drawing a flower may look easy, but doing so is often tricky. But that doesn’t mean you shouldn’t attempt to draw them. Once you know how to draw flowers, you’ll likely enjoy it so much that you won’t be able to stop.
Roses
Roses could be considered the most romantic flowers out there. If you think about it, they often make appearances at anniversaries, first dates and weddings.
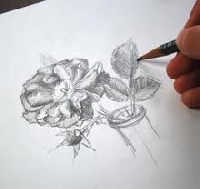
Fortunately, drawing roses is about as enjoyable as looking at them. To draw these beautiful blooms, start by drawing two curved lines to serve as the flowers’ stems with a drawing pencil or other medium like charcoal or pastels. Then draw a circle above each stem to designate places for the roses. Also draw two arcs together to form a leaf, and have several come off of leaf stems that come off of the main stems.
Lightly sketch the rose petals inside the circles. Use wavy lines to make the petals and have them overlap each other. Drawing a second curve over the top of the petals shows that the petals fold over. Now draw another additional line next to each stem to make them look thicker.
~
Draw jagged lines around the edges of the leaves to give them more character and make them look true-to-life. You can also draw veins inside them. Add a second line to each leaf stem as well, to make them look real. You should also add thorns to the stems.
Finish your petals by adding wavier lines to their outlines. To really make your roses pop, draw some shading. Create this technique by drawing small lines around the insides of the flowers, or where you think shading may occur. This extra step makes your rose look more realistic and oh-so-gorgeous.
Tulips
Tulips are perhaps one of the most cheerful and pretty flowers there is. You know spring is here when their bright blooms are open and glowing.
Drawing tulips is quite simple, as well. To start, draw a circle for the bloom, then a curved line for the stem. Draw two arcs to create a large leaf and draw one on either side of the stem. Then go ahead and draw one curved leaf that is folded outwards towards the bottom, which is a signature trait of this perennial plant.
Draw lines in the centers of each leaf to make them look more realistic. You should also start to draw in the contours of each petal by creating curved lines from the top of the bloom towards the bottom. Create a layered look at the top of the bloom by making some of the tops of the petals shorter than others to create dimension.
Once you are finished drawing your tulip, use your eraser to remove any stray lines you have in your drawing. Go ahead and paint the tulip or leave it as is. Either way is beautiful.
Now that you know how to draw flowers you’ll have no excuse for bare walls. These pictures will look gorgeous framed and hanging in your home. Additionally, your pictures will also make perfect presents. After all, there’s nothing like receiving good art, especially when it is homemade.
Resources:
TLC: How to Draw a Rose in 5 Steps
Easy Drawings and Sketches: How to Draw Tulip Flowers
Popular Savings Offers
Free Shipping
Free shipping on your order of $45 or more

Blick Studio Art-Materials for Artists Catalog

Free Catalog
Get FREE Catalog to browse Pet Supplies 4 Less products

Pet Supplies 4 Less


Free Catalog
Get FREE Catalog to browse Have You Done Your Yearly Medicare Plan Review
.jpg)
Have You Done Your Yearly Medicare Plan Review?


.jpg?w=3840 "Order Free Catalogs from Waterwise")


.jpg?w=3840 "Order Free Catalogs from Johnny Was")


.png?w=3840 "Order Free Catalogs from Peruvian Connection")
.png?w=3840 "Order Free Catalogs from Sur la table")
.png?w=3840 "Order Free Catalogs from Danbury Mint - Fine Jewelry")